
If you’re a frequent Sketch user, or totally new to the app, we have 15 tips and tricks (actually nine tips and six plugins!) to help you become Sketch savvy. Read on to learn more.
If you’re a web or UX designer, chances are you use Sketch a lot. If you use Sketch a lot, chances are you consider yourself a pro user, but are you aware of these tips and tricks to up your game?
1) Create Custom Shortcuts
This first one is not specifically related to Sketch, but rather macOS as a whole. Some tricks in this list make use of custom shortcuts… if it has a menu item, it can be a shortcut. What you need to do:
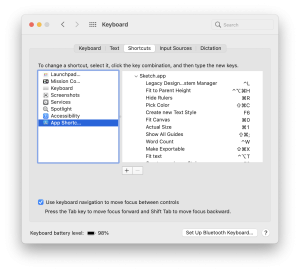
- Open System Preferences, click on Keyboard, click on the Shortcuts tab and click on App Shortcuts.
- Click the plus button to add a shortcut.
- Select Sketch from the Application dropdown.
- Provide the Menu Title—the exact name of the menu item, down to punctuation and capitalization.
- Provide the desired Keyboard Shortcut and click Add.
*Note may or may not need to restart Sketch.
2) Click anywhere and drag
You can drag a selected object around Sketch without needing to click the object to move it. With an object selected, hold down ⌘+Option, click anywhere and drag. This is useful if you are working with masks or overlapping transparent layers.
3) Find the distance between two objects
You can find the distance between two objects by selecting one object, holding Option, and hovering over another object. This works with text as well; if you hold ⌃+ Option, you can find the distance from text to object, rather than the text box bounds to object.
4) Perform mathematical equations
You can perform mathematical equations in value boxes.
5) Cut, Copy or Delete parts of an image
Sketch might not have powerful editing capabilities, but what it does have is helpful. By double-clicking an image, you can cut, copy or delete parts of it. For transparent PNGs, simply double-clicking it, then deselecting it will cause the PNG to crop itself on all sides to the first 99% transparent pixel.
6) Define resize points
If you ever need to resize objects using the width and height value fields, you can define what position to resize from using L (for left), R (for right), C (for center), T (for the top), M (for middle), B (for bottom).
7) Click and Drag Outside of the Export Preview
When selecting an item and clicking Export, you are presented with a thumbnail preview of the item to be exported. That thumbnail preview can be clicked and dragged to your desktop or inside your document. Dragging it back into your document is helpful for creating a duplicate artboard with an alternative state without all the countless layers of the original.
8) Change the Color of the Default Squares
Right from the start, Sketch’s default styles are applied to all new shapes you create—a light gray fill with a mid-gray border. This is fine for some, but for others, it’s a pain to constantly tweak the colors or constantly hide the border. Changing default styles will let you customize what color and style new shapes will be created with. You can do this by visiting Layer > Style > Set to Default Style.
9) Scissors Shortcut
If you create vector icons or artwork a lot in Sketch, you know how useful the Scissors can be. You also know how tedious it can be to constantly click the button in the toolbar. By following step #1 above, you can create a function-key shortcut for it. When creating an app shortcut for Sketch, provide “Scissors” as the Menu Title and a function key for your shortcut.
10) Round to Pixel
This and the following 2 plugins each have to do with pixel perfection. If you notice an element has non-integer sizing, like 75.25 pixels wide by 150.4352 pixels tall, with the element selected, you can click Arrange > Round to Pixel. This will resize the shape to 75×150. Since it has a menu item, you can add a custom shortcut.
11) TogglePixelFitting Plugin
One caveat to Sketch is we can either have pixel fitting or none, there is no in-between. With Pixel Fitting turned on in Preferences, every element we draw and resize fits the pixel’s edge, no matter how far in or out we are zoomed. As great as this is, it’s also bad for resizing vector artwork like complex logos. On the flip side, with it off, everything works smoothly, but shape edges could land on the .35 pixel mark, so things start looking blurry. Enter TogglePixelFitting, which adds a menu item to let you do just that—toggle the Pixel Fitting Preference option. Add this in conjunction with adding a custom shortcut and your game will further increase.
< https://github.com/KevinGutowski/PixelFit >
12) Move Half Pixel Plugin
This plugin does just what its name implies, it moves the select object a half pixel. The plugin adds the ability to move half a pixel in any direction while holding the Option key and directional arrow.
< https://github.com/canisminor1990/sketch-move-half-pixel >
13) Lippy Plugin
Lippy is a Lorem Ipsum content generator. It is a popup that can be called when a text box is selected, with options to customize the length and flavor of Lorem Ipsum.
< https://github.com/abynim/lippy >
14) Textbox Fit Content Plugin
This plugin comes in handy when resizing text boxes that, for some reason, just don’t wrap all of the text contained within. This plugin will set the height of a selected text layer to match the height of its content.
< https://github.com/juliussohn/sketch-textbox-fit-content >
15 ) Swap Styles Plugin
This plugin allows you to quickly swap styles between 2 layers, and it eliminates the need for all that duplicating and copy/pasting between styles.
< https://github.com/ozzik/swap-styles >
In our line of work, Sketch is an instrumental tool in our toolbox that allows our user experience team to build exciting experiences for users. We’re always on the hunt for new and useful tips—feel free to share any that you have discovered in the comments below.
If you’re interested in learning more about our User Experience Design experience, click here. Or if you want to drop us a note, you can contact us here.