We all know the saying, “a picture is worth a thousand words”, and the same goes for a professional headshot. According to a study done by Headshots, Inc., your headshot says more than a thousand words, it shows the following about a person in the photo:
- Competence: How successful or effective the person appears
- Likeability: How pleasant or likable the person appears
- Influence: How influential that person appears to be on other people
So, what does your current headshot say about you?
While some companies have professional headshots taken of you at the office—like the photoshoots we’ve done for Beacon Mutual and Hingham Savings Bank—it’s important to have your own as an employee. We believe you should always use a professional photographer to get the best possible photos. But if your company hasn’t provided one for you, you’re in a pinch and need to coordinate your own photo, we put together some tips to help.
Below is a comprehensive step-by-step guide for how to set up a photo shoot to achieve the perfect headshot.
1. FIND A BACKDROP
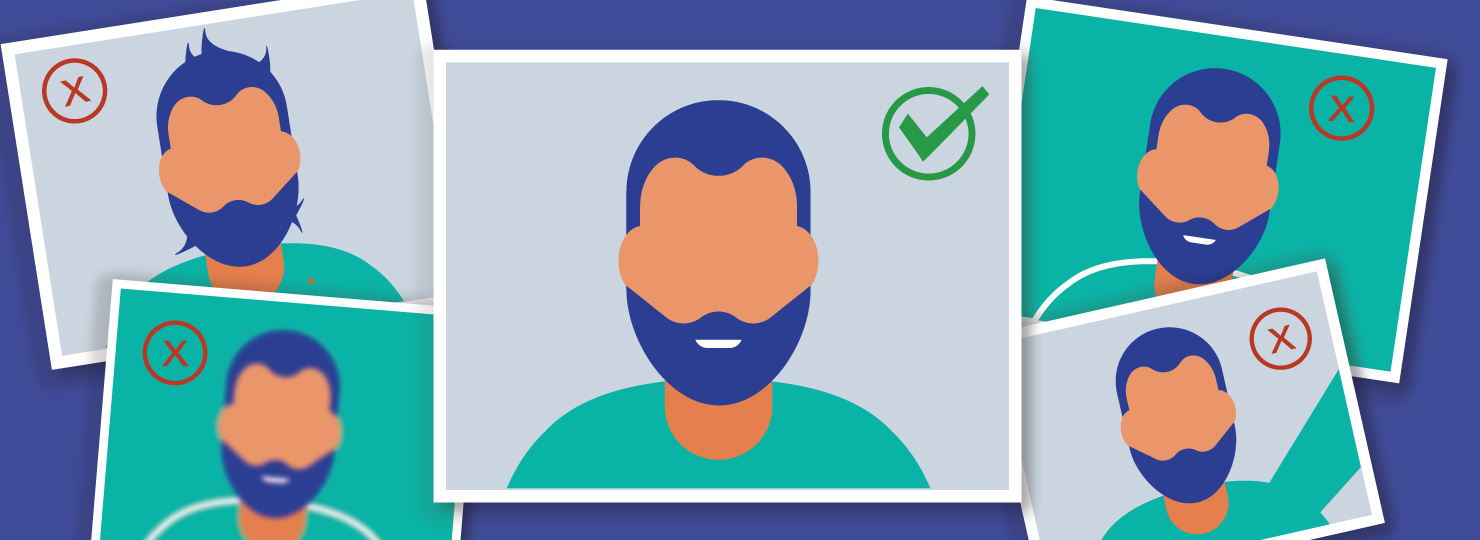
The first step to achieving a professional headshot is to pick a location. You can either choose a solid background or a wall with texture, like a brick wall. You can also choose to have blurred textures in the background, either from around your office or an outside scene with some greenery and color. Whatever background is chosen, it should fit the style of the company and the personality of the person.
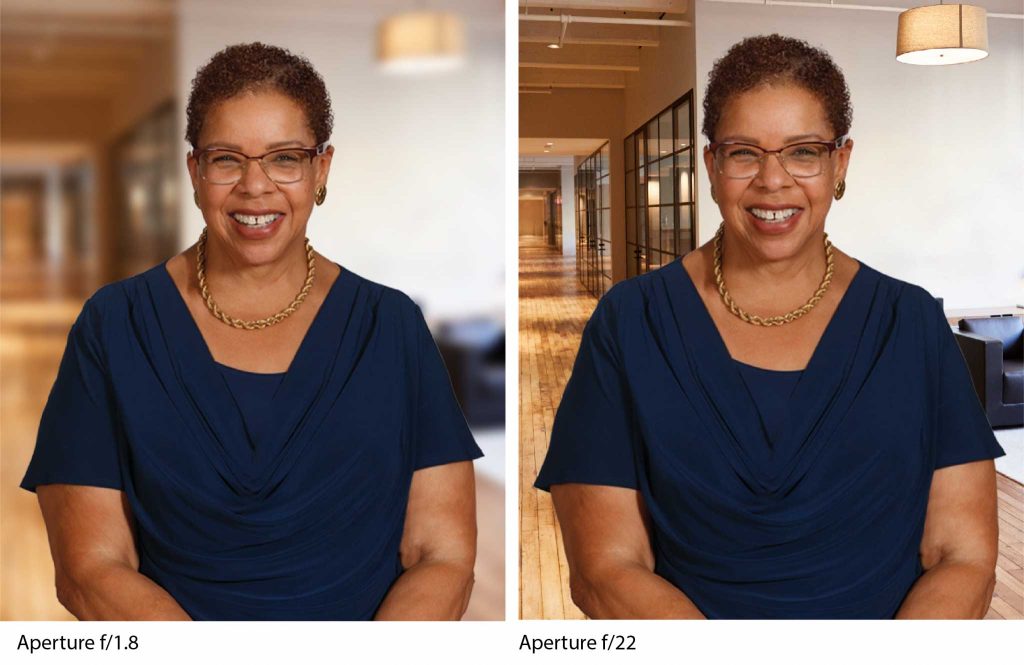
If you don’t have access to a plain background, just keep it simple. Make sure that you, the subject, remain in focus. You can do this by setting yourself further away from the background, adjusting the focus on the lens to be focused on the subject eye, and setting the aperture on the camera so that the background is blurred. Below is an image of how the aperture works. The lower the aperture f/1.8 blurs everything besides the one thing you want to have in focus, whereas a higher f stop, like an f/22, will have everything in focus. When taking your headshot, you most likely want to be around the f/4-f/5.6 range to make sure the subject is in focus through your viewfinder.
2. GRAB THE RIGHT EQUIPMENT
Once you have decided on the location, it’s time to set up your equipment. Most people will turn to their phones for photo ops but, if you’re going about this on your own, try to get your hands on the best camera you can, whether that is a DSLR camera or even a basic camera. Right now, we’re loving our Canon EOS R6 Full-Frame Mirrorless Camera.
If you don’t have access to a professional camera and are shooting the photo with your phone, make sure you hold the phone sideways so the picture is in landscape mode and that you Google how to set the best camera settings for the model of your phone. While phones are good to utilize, it’s always best to shoot in high quality with a professional camera like a DSLR and to blur the background by changing the aperture.
3. SET UP THE PERFECT LIGHTING
Now that you have your backdrop and camera ready, it’s time to think about your lighting. You don’t want to have the perfect backdrop and a great camera only to capture a silhouette in the dark. You can use natural lighting or set up lights.
For natural lighting, make sure you angle yourself or the camera to avoid any really dark shadows so the subject isn’t squinting. You want to be sure that your whole face is visible and that you don’t have harsh shadows. Be sure to bring in additional lights to accent the sun and fill in any shadows that are too dark. You can set up lights, even outdoors, to help balance the light to avoid these harsh shadows. Certain professional lights can even overpower the sun to better manipulate the light in your favor.
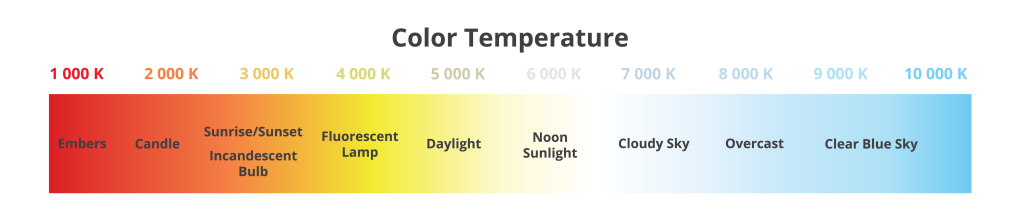
If you’re planning on shooting indoors, then turning off the lights inside and using lighting equipment is ideal. Light is measured on a Kelvin Scale (see chart below) so the sun is typically 5000K and lights inside start around 3200K. When shooting inside, you want to have professional lighting that is closer to 5000K and shut off all the inside lights so you can avoid light pollution from one Kelvin shade to the next.
4. DRESS UP FOR YOUR CLOSE-UP
Now that you have your location, your camera, and your lighting all set up, it’s time to concentrate on YOU.
To be photo-ready, plan an outfit with neutral colors that will contrast your background. But like your background, keep your outfit simple with some accent colors. While a certain pattern on your shirt may be fun and stands apart from the background, a busy pattern may distract the viewer from the subject’s face in the photo.
At the same time, it’s important to still look like you. Dress how people would recognize you every day, but think more neutral when choosing colors. For instance, if a Scally cap is a part of you and your everyday look, then wear the cap. The same thing with eyeglasses—just be aware of the glare from the sun/lights! Your pose, camera angle, and lighting will all have an effect on your glasses. Just like your shirt, make sure your tie pattern isn’t too busy. Also, be sure to double-check that jewelry/ties are on straight, your shirt is wrinkle-free, and there is no lint or blemishes.
You want to look 8am sharp, not 5pm relaxed.
5. STRIKE A POSE
At this point, you should be camera-ready and just need to find the perfect pose! It’s time to step (or sit) in front of the camera. But how should you pose for your perfect headshot?
You will want to be in the frame from at least from the waist up. While the photo may only be used from the shoulders up, in the end, it’s important to leave some room so that the headshot can be cropped and used for various needs. You also want enough background in the picture on both sides as well as the top. It’s more difficult to add more of the photo in Photoshop rather than to shoot the photo wider to begin with and crop it to the desired size.
Just like your wardrobe, your pose can reflect your personality. You’ll want your shoulders to be at a 45-degree angle away from the camera with your head looking at the camera. Be relaxed, try different angles, and enjoy your photoshoot. Keep the fun at a professional level and don’t forget to smile!
Absolutely no selfies as your professional headshot. Whether you’re using a phone or a camera, have a family member, friend, or colleague take the photo for you. Here is a couple of example poses—but remember that the background/pose should reflect the individual and the industry that you are in. You will find good examples of headshots below.

6. SAVE AND LABEL YOUR FINAL HEADSHOT
Now that your photoshoot is complete, it’s important to save the photo correctly so that it’s of the best quality for future use personally, or for your company to use. Your headshot should be high resolution, meaning it will be a larger file. Do not compress it as it will lose some of the quality you worked so hard to get in the previous steps.
Save your photo in the original format with full color. If you or your employer need a black-and-white photo, then it is an easy change from the original file.
Just as important as the photo itself, is the file name. The automatic naming convention generated from the camera is usually something like, “IMG_1234,” which may be easy for you to reference, but it can get lost easily.
A good example of a clear image file name is “Doe_John_headshot_2021.” An image label that is clearly defined will help you, and your employer, stay organized and not accidentally send or use the wrong image. The image name should cover your name, what it is, and the year it was taken. The year is important because it’s best practice to keep your headshot up to date so that it always reflects who you are.
IN CONCLUSION
Now that you have the steps to take your perfect headshot, we’d love to see what you come up with. So be sure to connect with us and share your results. If you have any concerns about high-quality cameras, lighting, or editing, we are happy to connect and help you achieve the perfect headshot.